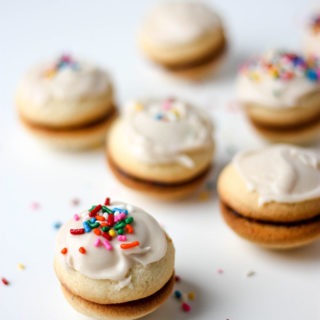
Vanilla Sandwich Cookies
These Vanilla Sandwich Cookies, aka Joan Kiss Biscuits, are a childhood favourite. So easy to make, these beauties and light, fluffy, and delightfully buttery. Careful not to over-cook them, as they will go hard and you'll be sad! But cook them right, and you're in for a delight! (see what I did there?)
Ingredients
- ½ lbs butter at room temperature, note 1
- 1 cup granulated sugar/caster sugar note 2
- 2 eggs
- 2 ½ cups self-raising flour
- raspberry jam
Vanilla Icing (ices 12 cookie sandwiches)
- ⅓ cup powdered sugar note 3
- ½ teaspoon vanilla extract
- ½ tablespoon butter melted
- ¼ teaspoon hot water
Instructions
- Preheat oven to 180C/355F
- Line a baking tray with parchment paper.
- In a bowl, beat together butter and sugar until creamy and butter is smooth.
- Add eggs, one at a time beating after each addition.
- Gradually add the self-raising flour, beating after each addition.
- Take about one teaspoon of the mixture, and roll into a small bowl. Lay out dough onto parchment paper, leaving adequate room for cookies to spread (note 4)
- Bake in oven for 8-10 minutes, until cookies are just very lightly browned (note 5)
- Cool on a wire rack.
Cookie Assembly
- Once cooled, pair cookies according to roughly size. (note 5)
- Spread a small amount of raspberry jam and sandwich cookies together.
Icing
- Place powdered sugar/icing sugar in a bowl.
- Melt butter in microwave 20 seconds and add to icing sugar along with hot water and vanilla.
- Stir until smooth and relatively thick. (note 6)
- Ice cookies and leave so icing can set.
Notes
note 1 - most baking websites will say use unsalted butter. I prefer to use salted butter because I'm a rebel.
note 2 - if you're in Australia, always use caster sugar for baking. It's been killing me that I haven't been able to find it in America. In America, use granulated sugar and it works fine. I always prefer to use caster sugar in baking because it is less grainy.
note 3 - I used about a third of a cup and it wasn't quite enough. Add powdered sugar gradually until you have reached adequate consistency.
note 4 - cookies will spread a lot, so I usually bake around 6 per time on one tray (depending on tray size). Just make sure you leave enough space for spreading.
note 5 - the first batch might take closer to 12-15 minutes while your oven heats up, but usually they take around 8-10 minutes. Don't worry if they don't look fully cooked, you want them really soft on the inside and crispy on the outside. They will also continue to cook once you take them out of the oven. Be aware however of your oven - mine cooks really fast on the bottom, therefore they burnt a lot quicker than the cookies I placed on the top rack. I just used my top rack and in my oven it took around 12 minutes. Just keep an eye on them to make sure they are not over done!
note 6 - after this step, you could freeze them. Place paired cookies into a snap lock/freezer bag and place in freezer.
note 7 - if icing is looking too runny, add more powdered sugar. If it is too thick, add just a touch more hot water. I used ⅓ cup plus 2 extra tablespoons until I reached desired consistency.