
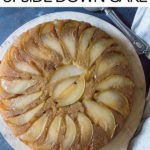
Pear Upside-Down Cake - a foolproof method to creating a beautifully caramelised, soft and buttery pear upside-down cake every time! Great for fall and winter entertaining and weeknight desserts!

I'm going to start off by saying firstly - this bloody cake!
Seriously, I am usually pretty good at nailing my bakes and recipes first down round, and it's not often I have a failure in the kitchen until this pear upside-down cake came into my life!
(actually, I lie, my fluffy sponge cake recipe could have been a disaster, but we won't talk about that!)
I'll say this and say it once... it helps to pay attention to the directions on your recipe card!
So let me break it down!
This recipe is based off one of my favourite recipes growing up as a kid - pineapple upside-down cake! Mum used to make this recipe all the time, and I freaking loved it! I am a huge fan of canned pineapple, and this recipe was just amazing!
In true fall spirit that I'm embracing at the moment, I really wanted to make a similar recipe but with a fall twist, that wasn't apples! Seriously, did you know that there is more seasonal fruit out there for autumn than just apple?

So I decided to make this gorgeous pear upside-down cake with my own fall twist. I used the base of the cake recipe from my Mum's recipe and substituted the pears for the pineapple.
This would have been fine, had I actually read the recipe properly the first time around when I was making it. Alas, I didn't which left me with a cake as dense as a brick. Not even kidding, if you had thrown it at someone, you would have knocked them out!
Instead of putting in 1 ½ cups of flour, I added 2 ½ cups so this is why I'm telling you, to read the instructions carefully! Don't be me, don't make brick cake!
This cake, after coming out perfectly the second time was a total winner in the family. Adam loved it, I loved it, I loved it so much I pretty much ate more than three-quarters of it within a few days.
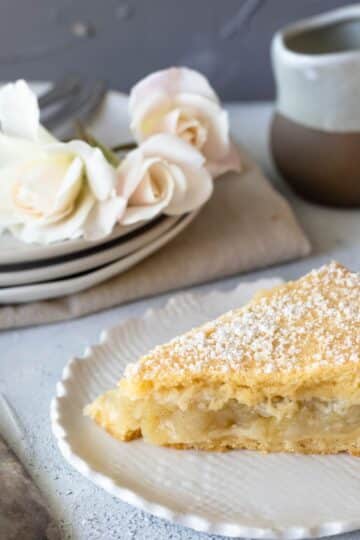
This pear upside-down cake has it all. A caramelized, crispy bottom that is balanced out by a beautiful, buttery cake on top. The pears complement the caramel bottom beautifully and brings what I would say, to be a fool-proof fall dessert!

What Makes this Pear Upside-Down Cake Fool Proof?
This recipe has been tested at least twice by me and has been in the family for many years, so I know it works every time. I even went to the effort of weighing out the measurements into both grams and ounces. Did you know that a cup is different in the US compared to Australia? While this doesn't really matter for savoury foods, it can make all the difference in sweet foods!
On that note, if you're making this from America, please use the cup measurements. If you're using this in any other country that uses metric measurements, please use the gram measurements!
This is a really easy cake to make and is great for fall entertaining. Serve with custard, ice cream, or heavy cream and you know you're friends and family are going to love it!

How to Make Pear Upside-Down Cake?
The Brown Sugar Butter Base
You start off with a brown sugar and butter base. You can either use a hand mixer or stand mixer to combine the ingredients. Personally, stand mixers are just easier! The method to combine butter and sugar is called 'creaming'.
You want to mix the softened butter and brown sugar together, until it's nice and smooth, with zero lumps! It'll take around 5 minutes. Before you even start making the recipe, take the butter out of the fridge to give it time to soften. Another tip - cut your butter into small cubes to cream. This makes it easier and quicker to cream.
The brown sugar butter base is a little hard to spread, but I found that the best method is to use your fingers and be patient. The mixture should cover all of the base of a 9"/22cm pan (by 2"/5cm deep). I very lightly grease the bottom and side layers of the cake pan so that it is easy to remove post cooking.
The Pear Layer
Fresh and firm pears are the best for this recipe. Pears that are too ripe tend to mush when cooked so look for a firm pear that is just on the cusp of being ripe.
As far as pear varieties, I don't think it matters. I prefer to use Green Anjou Pears, Bartlett Pears or Concorde Pears. These pears are all on the greener side and I find the flavour is perfect with the brown sugar butter base.
Carefully slice the pears, leave the skin on, but remove the core, then slice into quarter inch/3/4cm thick pieces. Layer them in a pretty pattern on top of the brown sugar butter base so that when the cake is turned out, you can see a distinct pattern. You can see my images for pattern inspiration!
You'll want to gently push the pears into the base, not so much that they touch the bottom of the pan, but enough so that they don't move when you pour over the cake batter.
The Cake Layer
The cake layer is a simple butter cake. Once again, I prefer to use my stand mixer for this step. Like most cakes, you start by creaming together the butter and sugar, then adding the eggs one at a time.
Finally, you'll gradually add the flour beating after each addition, and finishing with the tablespoon of milk. The mixture should be smooth and lump-free. Make sure to use a spatula to wipe around the edges of the bowl to incorporate all the mixture.
Carefully pour the cake batter over the top of the pears. Use a spatula to very gently spread the cake batter, avoiding moving the pears too much.
Cooking and Cooling Times
Cooking time may vary depending on your oven, but as a general rule, I bake this cake at 350F/180C for 40-45 minutes. The top of the cake should be lightly browned, not burnt. A good way to testing the cake, is to insert a metal skewer or knife into the middle of the cake. If the skewer comes out clean with a few crumbs, it is ready.
I then cool it in the pan for 45 minutes, before gently running a knife around the edge of the cake tin to help release the cake.
Top tip - turn the cake onto the plate or board that you are serving it on! To turn the cake out, place your plate or board in the cake pan, and gently flip the cake out onto the board. The pear pattern should now be at the top of the cake.
Dust with a little icing sugar and serve with custard, cream or ice cream!
Everyone needs a fool-proof cake, and this pear upside-down cake is your fool-proof cake for fall entertaining. It would complement a cozy fall dish, like my slow cooker beef ragu or my chicken massaman curry so well! And, if you don't like pears, by all means, substitute them with apples to make a beautiful apple upside-down cake!
And happy fall entertaining you guys! Isn't this holiday season exciting?
Georgie x x

📖 Recipe

Pear Upside-Down Cake
Ingredients
Brown Sugar Butter Base
- 2.1 oz unsalted butter softened
- ½ cup brown sugar firmly packed
- 3 ripe pears sliced into ¼" or ½ cm slices
Cake Layer
- 3.2 oz unsalted butter
- ½ cup sugar use castor sugar if it's available
- 2 eggs
- 1 ½ cups plain flour
- 2 ½ teaspoon baking powder
- 2 tablespoon milk
Instructions
- Grease a 9"/22cm round cake tin with a little bit of butter
- Preheat oven to 350F/180C
Brown Sugar Butter Base
- Combine softened butter and brown sugar into a bowl. Cream either by hand or with a stand mixer, until the sugar and butter are combined and there are no lumps.
- Use a spatula and dollop out the creamed butter and sugar mixture into the greased round pan.
- Use your fingers to gently press out the butter and sugar mix, until it evenly covers the bottom of the pan.
- Arrange the sliced pears in a pretty pattern so that they cover the base of the brown butter sugar mix. Gently press the pears into the mixture, but not so much that they touch the actual pan.
Cake Layer
- Place butter and sugar into a bowl and use a hand mixer or stand mixer to combine the ingredients together until smooth.
- Add eggs 1 at a time and mix until combined.
- Sift the flour and baking powder, and gradually add to the mixture, beating after each addition.
- Add the milk and combine once more for 30 seconds. Make sure you're scraping down the sides of the bowl as you go.
- Gently pour the cake batter over the top of the pears.
- Use a spatula to smooth over the surface for an even covering.
- Bake in the oven for 40-45 minutes, or until lightly browned on top and cooked through.
Liz says
I just made this and I don’t think I’ve even had an upside down cake. It is very good, but I feel like the pears should have been peeled and it could have used some spice.
Georgie says
Thanks for the feedback!
JB says
I am going to try this recipe later today. As far as spice goes, you could try a very little bit of cinnamon/nutmeg.
Meredith says
Ooh - My mom used to make pineapple upside down cake, but I think the buttery sugary topping would be so delicious with pears. I can not wait to try your recipe, thank you!
Georgie says
Thanks so much Merideth! Let me now how it goes! I love making the pineapple version in the summer!
Molly Kumar says
This is just so gorgeous and love the flavors. I love pear cake but never tried it at home till now. I'm saving your recipe to try soon.
Georgie says
Pear cake is delicious and I'm not usually a huge pear fan! the bottom goes like caramel, it's just lovely!
Caroline says
I love pear in baking and upside down cakes are such a classic. This looks great and handy with all the tips.
Georgie says
thanks Caroline, I haven't used pears too much in baking until now but I think I'm hooked!
Cindy Gordon says
Everything about this looks delicious! I love pear and I love cake! So this is a win!
Georgie says
he he thanks Cindy:)
Jacqueline Meldrum says
Oh now all that needs is some lovely hot custard or cold vanilla ice cream. Mmmmmmm!
Georgie says
OMG custard would be so so good! My mum makes fabulous custard, I'm actually bringing out a recipe with custard soon!
Deepika says
I am a fan of Pineapple upside down cake and this version is equally tempting. I love, how well you have walked through the making of the cake.
Georgie says
Thanks Deepika 🙂 i find it so much easier to make a recipe when I have the steps clearly written out!